
#the100dayproject : handmade tags 47/100-2 : holiday tags
hey friends!
do you ever have those ideas that you think are going to be money - like so amazing that there's no way they won't work out? and then you try them and they totally ... don't?
live and learn and take something away from it i say.
if you can't tell where i'm going with this - this entire situation happened today. the inspiration wheel landed on dry embossing and i had the great idea to attempt to emboss some of the two-layer tags i showed a few days ago. however - they didn't turn out exactly as i had hoped, but that's okay. i like some elements and some just didn't work.

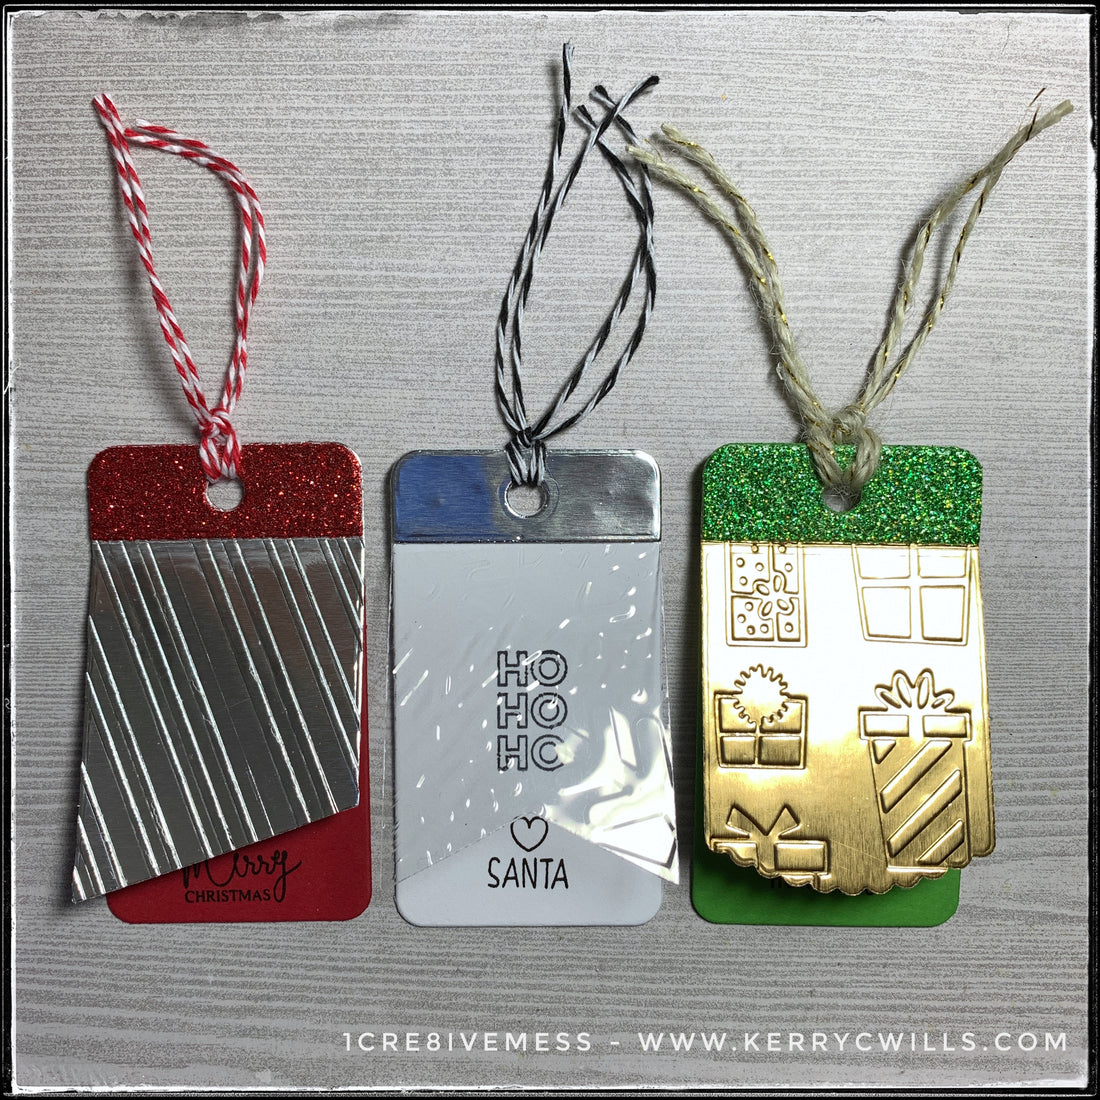
this photo above is of all three tags that i attempted shown together - but i'll go over them one by one, sharing what i liked and what worked as well as what didn't.
for each of the three tags i began with a solid colored cardstock as the base level. each of the top layers are embossed with a different texture.
the tag on the far left has a red base and the top layer is silver foil. problem one with this tag is that either the texture from the embossing folder was too intense or the paper was too thin. the silver layer warped a little and almost has tears in some places.

the section at the top that adds reinforcement was cut from red glitter paper and i love this aspect. it's super glitzy [without shedding any glitter] and holds red and white baker's twine which could be tied onto a gift.
stamped on the inside are two sentiments - both visible when the silver layer lifts up. "to: _____ and fr: _____" are stamped near the top of the red base and "merry christmas" is stamped near the bottom so it's somewhat visible when the top layer is flat.

the second tag from the first photo above sounded great in my head, but didn't work out quite the way i intended. the base is white and is stamped in black ink with the words "ho ho ho" above a tiny heart and the word "santa" [- fun fact - when we were growing up, we only ever got one present from santa. the rest were from mom and dad. it was great so that we believed in the magic, but it was also known where the majority of the gifts came from. i also love this idea - especially in today's age since so many kids get big expensive gifts from santa but other's don't. it evens the playing field i think, plus, it keeps the magic alive.]
the top layer was cut from clear acetate before being embossed with a snowflake pattern. i think that it would have shown up much better if i did a double layer with vellum underneath or maybe a colored tag base. the texture is super cool but it's not easy to see. the top portion that's the reinforcement was cut from shiny silver cardstock and i think it worked well - so that's a win. black and white baker's twine added to the simple color scheme but isn't overly holiday-ish.

i think that snowflakes paired well with the "ho ho ho" and "santa" sentiment, but the top layer just wasn't a win.
the third tag [shown on the far right in the first photo above] is probably the most successful tag of the three. it's also my favorite! the top layer is a gold foil cardstock and has been embossed with a pattern full of presents.

the bottom of the gold embossed layer is a slight scallop on a rounded edge but the pattern is the highlight of this tag. the texture is awesome and the glittery detailed reinforced top portion has some of the same gold color flecked in with the green.
a green tag base features the same "to: ______ and fr: _____" as on the red tag, but near the bottom is the sentiment "happy holidays" and they're all stamped in black ink as well.

all of the tags have two layers of cardstock on the base level so they're nice and sturdy for adhering to a gift or package. i'll be making more now that i know what works and what doesn't and then i'll be sharing them online, along with some styles i shared last week.
i've got a lot coming up this week and as usual, my to-make list is long! i've got some pretty lofty goals coming up and i'll be sharing all the sneak peeks here before instagram and facebook. if you're not following me there already, you definitely should be! also - feel free to tag and share with a friend who might appreciate some snail mail.
47 days down - 53 to go! here's to another amazing week!